A look At Roof Sheathing
Roof sheathing is applied over the rafters or trusses creating a deck or nailing base for the roof covering. It also increases the rigidity of the roof framing.
Sheathing for the roof can be materials such as lumber,square edge or tongue and groove, plywood or particle board panels.
Roof sheathings are much the same as wall sheathing in that the installation methods and types of materials are much the same.The difference however, is in the thickness of the material being used.
Roofs are designed for certain load conditions,such as snow, depending in what part of the country you live in. Therefore roof sheathing has a different requirement than wall sheathing.
Always check the building code in your area for the proper code requirements.
The spacing between rafters or trusses and the type of roof covering being used will be factors that will determine the thickness of the sheathing material to be used.

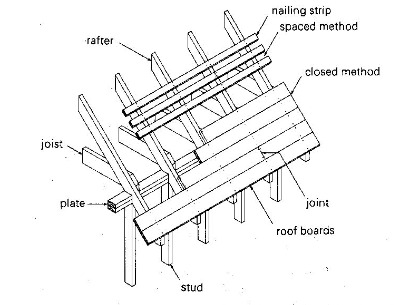
If you plan on shingling your roof with wood shingles, strapping the roof, as shown in the top part of the illustration, a distance apart equal to the exposure of the shingle is the method used. In other words if the shingle has 6" exposed to the weather, the strapping should be spaced 6" apart.
By strapping the roof in this manner, it will allow air circulation below the shingles to help prevent decay.
The bottom part of this illustration shows the proper method of applying lumber sheathing.
Before you start applying the sheathing to your roof make sure the rafters or trusses are straight.
To do this, plumb the outside rafter and brace it securely in this position. Half way up, place a board across the rafters or trusses, nailing one end to the outside rafter.
With someone standing on the ground and looking up at the rafter, move the rafter sideways to a straight position, according to their direction.
Drive a nail through the board and into the rafter, this will hold it in place. Repeat this process until all rafters or trusses have be straighten.
It is recommended with boards 8" wide or narrower,to use two nails when nailing to the rafter or truss. Three nails per rafter are recommended for boards wider than 8". Boards wider than 12" should not be used for roof sheathing.
The joints of the boards should be staggered on the rafters to maintain the rigidity of the roof.

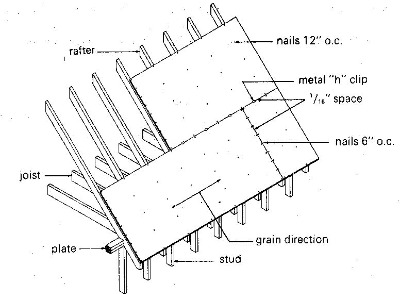
This illustration shows the proper method of installing roof sheathing panels.
Before laying my first row of panels I like to snap a chalk line across the rafter at a point equal to the top edge of the panel. This ensures straight alignment of the first row.
If using plywood as a roof sheathing the face grain is placed at right angles to the rafters or trusses as shown in the illustration. End joints should be staggered to ensure roof rigidity.
A space of 1/16" is required between all edges of the paneling. Using a nail as a spacer between the sheets will insure at least 1/16" spacing is maintained.
Metal “ H”clips are used to support the panel's edges between the rafters or trusses. This eliminates the need for blocking to be installed .
Nailing of the roof sheathing panels is the same as wall sheathing ,6" o.c. On all edges and 12" o.c. elsewhere on the panel. This is where a nail gun will pay off in spades.
Before I started building I dug into my building budget and bought a nail gun. I called it my hired hand .In fact it was better than a hired hand,I only had to pay it once.
This made putting sheathing on a breeze. First I would lay out a row of panels,tacking them in place with a nail in each corner, then I would use the nail gun to nail the sheets securely in place. This is an investment I highly recommend.
Return from Roof Sheathing to Steps to building